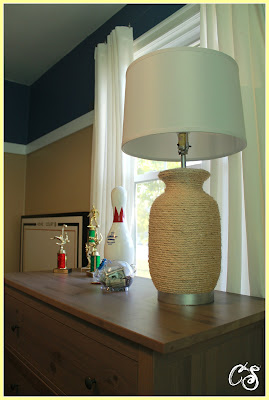
Back in May I completed this lamp for my son's room. I have two boys ages 8 and 4 whom share a room. I wanted to add an textual element to their space that was interesting.
I found the lamp at a local thrift store, I like to hit up thrift stores from time to time. You never ever know what you might find, it's usually hit and miss. One Saturday I was browsing Goodwill and spotted a lamp, I didn't quite like the color but I liked the shape of it and I knew I could turn it into something amazing.
When I decided to use it in my son's room a million ideas ran through my head. I really wanted to do Janell's idea, from House of Fifty, for a chalkboard lamp. Dr. J and I had to ix nay that idea, we know our boys and it just wouldn't work. But it is a really cute idea!
As you can see I landed on the idea of rope. There are many kinds of rope you can chose from like jute, sisal and manila. For this project I used sisal that I found at our local hardware store. This is a super easy project.
Here's what you would need besides a lamp and shade:
- rope
- hot glue gun and hot glue
Easy enough right? I changed the original color from gold to silver leaf by using rub 'n buff. You can find it in many craft stores. After applying rub 'n buff I started wrapping the lamp base with the sisal rope.
I applied a small amount of glue to the end of the rope to make sure it wouldn't come apart. Start at the back and bottom of the lamp base. Apply hot glue to the lamp in small sections, about 3 inch sections, press the rope to the glue, wrapping the rope around the base and holding it in place for a few seconds as it begins to setup.
Remember to press each layer together as you are wrapping it around the base, this will insure no gaps and that you won't see any of the lamp through the rope.
Trim ends on an angle and press it tightly against the previous coil making it appear seamless. Since my lamp was big I had to use two things of sisal. I made sure to end my first 100 feet of sisal at the back of the lamp and started with the new section like I did at the beginning.
I had to trim the lamp :) the rope frays a little. And in no time at all it's complete and ready for you to showcase. It turned out better than I expected.
Price Breakdown
Lamp - $2.50 (It was $4.99 but it was half off day to my surprise!)
Sisal - $ 12.96 ($6.48 ea - had to purchase two)
Glue gun w/ glue sticks - already had on hand
Lampshade - $14.99 from HomeGoods
Total = $30.45
Lets take one last look...
BEFORE AFTER
What projects have you done lately? Any in rope? I would love to hear your stories. See you soon!
Linked up with Shabby Nest, Serenity Now, Our Delightful Home & Our Fifth House!


Nice post!!!
ReplyDeleteSweet...You always have the best ideas...
ReplyDeleteI love the way this lamp turned out. It looks SO chic!
ReplyDeleteWe are having a $15/15 minute project party, and I would LOVE for you to link this up :)
http://interiorsbykenz.com/15-15-minute-project-link-party/
You totally transformed that lamp, I love it!
ReplyDeleteLove the look! And great find, too!
ReplyDelete